
Okay so where have I been since October? Honestly I haven't been doing anything particularly interesting. I contemplated starting another blog because unfortunately my sister in law is no longer able to post due to the fact that she is busy with four out of five kids in school :) I'm not going to start a new blog because honestly I don't feel like starting over. I'm pretty sure I could just copy everything over, but I'd like to just keep going with this one. So from now on its just me, a home made sister I suppose :)
When I originally came up with the idea of starting a blog, I wanted to talk about things related to motherhood and all of the funny and interesting things that go along with raising kids, specifically as a stay at home mom. However, that never really happened, it turned into me posting about food and my sewing endeavors. I have decided that now I'm going to write about all of my endeavors, just in case there is someone out there like me who is wondering about something, or is thinking about trying something new and wants to find out if someone else has tried it too. I also plan to include stories of everyday life that might bring a smile to your face if you are having a bad day.
This year I plan on getting back on track with things because over the past two years I was either pregnant, or trying to get newborns to sleep through the night. I was also feeling a sense of accomplishment because I got through the "terrible twos" with an absolutely angelic child. But when my little one turned three, things changed! Whew, it was exhausting and trying, but now she's back to her normal sweet self, YAY! My "newborns" are now a year and half, and life is getting a little calmer. So here I am ready to share some of our experiences and hopefully keep up with this blog a little better!
On another note, a lot of my free time has been spent on Pinterest dreaming of Spring. Now that Spring is here things are starting to get busy again. I have gotten so many ideas from Pinterest it's hard to keep up with them, but that's why there is Pinterest so you can pin everything to remind yourself :) I have a huge list of things to do. My sofa and loveseat are over 10 years old and are starting to show their age, which means I can either replace them (not going to happen), or I can cover them. I want everything to look fresh and clean and I can't find anything that will fit my couches exactly so I have decided to make my own slipcovers. I have never taken on such a daunting sewing project, so it will be an interesting undertaking. But that is a project for a later date because right now I have yard work to do!
5.01.2013

10.24.2012
Homemade Trick or Treat Bags
OK so I made some trick or treat bags for the kids. Each child has a bag that matches his or her costume. I decided to do this a little old school because I don't have any kind of machine that cuts things out for me :( But they were really easy to make and only took about 1 hour for all three. I went online and searched images for a pumpkin (for Cinderella), scottish terrier (for Dorothy), and a can of spinach (for Popeye). I printed them out, cut them out and pinned them to my fabric. The next step was to sew and presto! Cute trick or treat bags. I'm so excited! I didn't take pictures along the way, but I found a tutorial online to share how I did them found here. I did mine differently from hers, but the concept is the same and it's still easy peasy!
I hope you make some for your little ones. They really are a quick project and your little ones will LOVE them! Mine said "Oooh Mommy, I love it!" I'm not kidding! It made my day!

I hope you make some for your little ones. They really are a quick project and your little ones will LOVE them! Mine said "Oooh Mommy, I love it!" I'm not kidding! It made my day!

10.08.2012
Baby Dorothy Costume
So this year I decided to make my kiddos Halloween costumes. While I was going through bins of clothes from my oldest to pass down to my youngest I found a pair of red shoes that she could fit now which made me immediately think Dorothy from the Wizard of Oz. Lucky for me I had some blue and white checked fabric from yet another unfinished project from this summer :) It was perfect for my little Dorothy. Also now Kohls has little Toto dogs which is PERFECT! So here's what I decided to do:
I figured the best bet for a little one is to make the costume in three pieces. I bought a long sleeved turtleneck onesie and sewed the "apron" directly to that, made the skirt seperate, and a belt to cover the elastic of the skirt to make it look more cohesive. I also wanted to do this in pieces because the skirt can be used as a regular skirt after Halloween. I didn't do any measurements for the straps or the center piece of the apron. I just cut the fabric and folded it until the proportions looked right, and I did the same thing for the center piece.


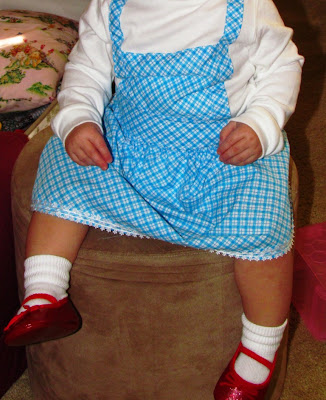

I figured the best bet for a little one is to make the costume in three pieces. I bought a long sleeved turtleneck onesie and sewed the "apron" directly to that, made the skirt seperate, and a belt to cover the elastic of the skirt to make it look more cohesive. I also wanted to do this in pieces because the skirt can be used as a regular skirt after Halloween. I didn't do any measurements for the straps or the center piece of the apron. I just cut the fabric and folded it until the proportions looked right, and I did the same thing for the center piece.

Again I didn't measure my belt I just figured out how wide I wanted it by placing fabric on the onesie then quadrupled that number to get my finished width. For example if the finished width is going to be 2 inches then you want to cut your fabric 8 inches wide. I made the belt the same way I made the straps for my carseat canopy HERE. As far as the length of the belt I just measured around my little one and doubled that number, but I think if I were to do it again I would go 2.5 times bigger.
For the skirt I used this tutorial and it was so easy, I will definately be making more of these! At the bottom of the skirt I added trim to make it a little cuter and it really did make a difference.
For the finishing touch I made a little bow from sparkly fabric and attached it to a headband which really makes this outfit pop! My little one doesn't really have any hair so this bow is darling!

Here's the finished product:

Here's a close up:

As most babies are at this age, she was wiggly so the skirt shifted, but I do need to cut the elastic a little because it's just a little too big even for growing into.
This costume did not take much time at all and it is ADORABLE! I love it.
Next...Popeye!
Apple
9.15.2012
Laminated Activity Pages
Once again, it has been a while since I've posted anything. I've been keeping myself busy lately. This time of year when things are starting to cool down, I get sooo excited because autumn is my favorite time of year. Since I plan on cramming my calendar full of fall activities, it's time to get my house organized so that I don't feel depressed looking around at a cluttered house when I come home from a fun day of fall stuff. Anyway, more on that later...
I have a confession, many of you may not know this about me, but I am a celebrity grandma. My grandchildren's names are Milli, Geo, and Bot...you may know them better as Team Umizoomi :)
My little one LOVES Team Umizoomi! For her birthday, she wants a Team Umizoomi party, she has the Team Umizoomi dolls (which I purchased HERE), she wants to watch the show all the time, and wherever we go, Team Umizoomi follows, whether I see them or not. The other day I told my little one that Team Umizoomi had to go help other girls and boys, when I was told that Milli, Geo, and Bot are her children and need to stay with her. I suppose they are going to be with us for a while. So I decided it would be a good idea to go back on Nick Jr.'s site and see what kind of Team Umizoomi stuff I could find. They have a lot of stuff. Here are the links to what I printed out...Bot's Belly, Hidden Picture Pack, Puzzle Pack. I have also printed out a bunch of Peppa Pig stuff too. Sometimes I'm Mummy Pig, she's Peppa and my husband is Daddy Pig, her little brother is George and her little sister is Peppa too. Anyway, I printed everything out, well not really, there is a lot more on their site, but I had to cool it because I printed out a lot of coloring pages and stuff from Disney Jr. too. After all of the printing, I decided to start laminating some of the stuff so it can be used over and over again. Here is a sampling:


I have a confession, many of you may not know this about me, but I am a celebrity grandma. My grandchildren's names are Milli, Geo, and Bot...you may know them better as Team Umizoomi :)
My little one LOVES Team Umizoomi! For her birthday, she wants a Team Umizoomi party, she has the Team Umizoomi dolls (which I purchased HERE), she wants to watch the show all the time, and wherever we go, Team Umizoomi follows, whether I see them or not. The other day I told my little one that Team Umizoomi had to go help other girls and boys, when I was told that Milli, Geo, and Bot are her children and need to stay with her. I suppose they are going to be with us for a while. So I decided it would be a good idea to go back on Nick Jr.'s site and see what kind of Team Umizoomi stuff I could find. They have a lot of stuff. Here are the links to what I printed out...Bot's Belly, Hidden Picture Pack, Puzzle Pack. I have also printed out a bunch of Peppa Pig stuff too. Sometimes I'm Mummy Pig, she's Peppa and my husband is Daddy Pig, her little brother is George and her little sister is Peppa too. Anyway, I printed everything out, well not really, there is a lot more on their site, but I had to cool it because I printed out a lot of coloring pages and stuff from Disney Jr. too. After all of the printing, I decided to start laminating some of the stuff so it can be used over and over again. Here is a sampling:


And there is plenty more where that came from :)
I also found something that I thought was kind of cool. It's called "Counting the House" I found it here. So what you do is give this to your little one and have him or her go around the house and find and count all of the items on the page. I think it's a fun way to get little ones to grasp quantity and counting, so it also got laminated.

So anyway, that is a little of what I've been up to lately, but there is more to come.
Apple
8.13.2012
Chicken Casserole
Sometimes I have a crazy craving for something to eat from my childhood. When I was little I remember going to a church function and my grandma brought this for the potluck. I had had it before, but for some reason it tasted especially delicious that day. From that point on I loved it when she made it. She used cream of celery soup because she didn't like cream of mushroom and canned chicken, but I am not really a fan of celery so I use cream of mushroom and I always make cook my own chicken. I'm sure everyone has a variation of this recipe, but I just thought I would share mine. Here's what I did:
1 large chicken breast, shredded or cubed
1 can of cream of mushroom
1 can of cream of chicken
1 can of milk (just regular milk poured into soup can)
1 small onion, chopped
garlic cloves, chopped (I used three because my family loves garlic)
About 1 cup of frozen sweet peas
1 cup shredded cheddar cheese
About a half bag of egg noodles cooked
Open cans and put into a large bowl. Add milk and mix thoroughly. Add a little black pepper. I always use reduced sodium cream soups so I added just a little salt too.
Saute onions in a little bit of olive oil. Cook until onion starts to get a little color then add the chopped garlic. Cook for just about 30 seconds then add the shredded chicken. When the bottom of your pan starts to get a little brown because the oil has been absorbed add the peas. Stir for a few seconds as the peas start to unthaw. This will start to loosen up the brown bits a little. Then add a couple of ladles of the cream soup mixture. Scrape the bottom of the pan to get all of those yummy brown bits. Make sure you don't skip the step of really allowing browning in the pan because that adds so much flavor. When you've gotten all of the brown bits mixed into the sauce dump the mixture into the bowl with the remaining cream soup mix, stir thoroughly, then add the cooked noodles a little at a time until you get your desired noodleness (totally made up that word, aren't I clever?).
Pour into a buttered dish and bake covered in 350 degree oven for about 30-45 minutes (until bubbly). Uncover and sprinkle on cheese then bake until cheese is melted. Remove from oven and let it sit for a few minutes.


1 large chicken breast, shredded or cubed
1 can of cream of mushroom
1 can of cream of chicken
1 can of milk (just regular milk poured into soup can)
1 small onion, chopped
garlic cloves, chopped (I used three because my family loves garlic)
About 1 cup of frozen sweet peas
1 cup shredded cheddar cheese
About a half bag of egg noodles cooked
Open cans and put into a large bowl. Add milk and mix thoroughly. Add a little black pepper. I always use reduced sodium cream soups so I added just a little salt too.
Saute onions in a little bit of olive oil. Cook until onion starts to get a little color then add the chopped garlic. Cook for just about 30 seconds then add the shredded chicken. When the bottom of your pan starts to get a little brown because the oil has been absorbed add the peas. Stir for a few seconds as the peas start to unthaw. This will start to loosen up the brown bits a little. Then add a couple of ladles of the cream soup mixture. Scrape the bottom of the pan to get all of those yummy brown bits. Make sure you don't skip the step of really allowing browning in the pan because that adds so much flavor. When you've gotten all of the brown bits mixed into the sauce dump the mixture into the bowl with the remaining cream soup mix, stir thoroughly, then add the cooked noodles a little at a time until you get your desired noodleness (totally made up that word, aren't I clever?).
Pour into a buttered dish and bake covered in 350 degree oven for about 30-45 minutes (until bubbly). Uncover and sprinkle on cheese then bake until cheese is melted. Remove from oven and let it sit for a few minutes.

Dish up and enjoy!

7.16.2012
Homemade Sloppy Joes and Buns
My husband and I love sloppy joes, however, every time I made them with the canned stuff my hubby got really bad heartburn. I then made it my mission to make a homemade version. I've been making this for a while now and it's tasty! Here's what you need:
2 lbs Ground Beef
1 1/2 C Ketchup
2-3 Tbsp Brown Sugar
3 Tbsp BBQ Sauce
2 tsp mustard
1-2 C Water
I season my beef with salt, pepper, bell pepper, 3 cloves of garlic, oats, carrots, onion, and spinach. After it's cooked and drained I add the rest of the ingredients. Obviously everything can be adjusted to your taste. My amounts vary depending on how I season my meat. If I add more carrots I use less brown sugar for example and sometimes I don't need to add as much water. Cook everything for about 20-30 minutes and you're done! I freeze half of it for a quick meal some other time.
I decided to make rolls one day (I love my bread machine), but time was not on my side so my dough rose way too much. I thought for sure that it wasn't going to turn out right, but what ended up happening is really large dinner rolls that I decided to use as buns. Here's what you need:
3 1/4 C bread flour
1/4 C sugar
3 tsp instant yeast
1 tsp salt
1 C warm water
1 egg
2 Tbsp butter
I put water, egg, and butter into the machine first. Then I add my dry ingredients. I put the flour and sugar in (I combine them in a bowl first), make a well in the center and put my yeast in. Off in one corner I add the salt because you don't want your salt to touch your yeast yet. Put it on dough cycle and work it's magic. After it's done, take it out and make 12 balls. I put mine in a 13x9 glass dish and let it rise for 30 minutes. Brush with butter and bake at 350 for about 15 minutes and you have delicious soft buns!
Put your sloppy joe mix on the buns heat up some tator tots and dinner is served!

2 lbs Ground Beef
1 1/2 C Ketchup
2-3 Tbsp Brown Sugar
3 Tbsp BBQ Sauce
2 tsp mustard
1-2 C Water
I season my beef with salt, pepper, bell pepper, 3 cloves of garlic, oats, carrots, onion, and spinach. After it's cooked and drained I add the rest of the ingredients. Obviously everything can be adjusted to your taste. My amounts vary depending on how I season my meat. If I add more carrots I use less brown sugar for example and sometimes I don't need to add as much water. Cook everything for about 20-30 minutes and you're done! I freeze half of it for a quick meal some other time.
I decided to make rolls one day (I love my bread machine), but time was not on my side so my dough rose way too much. I thought for sure that it wasn't going to turn out right, but what ended up happening is really large dinner rolls that I decided to use as buns. Here's what you need:
3 1/4 C bread flour
1/4 C sugar
3 tsp instant yeast
1 tsp salt
1 C warm water
1 egg
2 Tbsp butter
I put water, egg, and butter into the machine first. Then I add my dry ingredients. I put the flour and sugar in (I combine them in a bowl first), make a well in the center and put my yeast in. Off in one corner I add the salt because you don't want your salt to touch your yeast yet. Put it on dough cycle and work it's magic. After it's done, take it out and make 12 balls. I put mine in a 13x9 glass dish and let it rise for 30 minutes. Brush with butter and bake at 350 for about 15 minutes and you have delicious soft buns!
Put your sloppy joe mix on the buns heat up some tator tots and dinner is served!

Enjoy!
Apple
7.14.2012
Pacifier Clips
I have purchased a couple of pacifier clips recently, but I didn't really care for the way they looked. I never thought to make my own until I stumbled upon THIS. It looked easy enough so I made four. I switched it up a little. Instead of using ribbon down the center of the clips I used coordinating fabric. I didn't take pictures of how I made the strip for the middle, but this is what I did:
I took one strip of fabric that was 1.5"x10" and folded it right side together lengthwise and sewed a stitch all along the side. Then I flipped it right side out and ironed flat with the seam in the center. I didn't bother to finish the ends because I sewed it onto the main fabric before finishing the clip. Then just finish following the instructions for the remaining pieces. The only thing is I didn't have to add any ribbon at the end of the project because I added the coordinating "ribbon" in the beginning. Here's how it turned out:


I took one strip of fabric that was 1.5"x10" and folded it right side together lengthwise and sewed a stitch all along the side. Then I flipped it right side out and ironed flat with the seam in the center. I didn't bother to finish the ends because I sewed it onto the main fabric before finishing the clip. Then just finish following the instructions for the remaining pieces. The only thing is I didn't have to add any ribbon at the end of the project because I added the coordinating "ribbon" in the beginning. Here's how it turned out:


Just make sure you put the suspender clip on the right way. I put it on backwards and now have to undo my stitches and re-attach it. Ugh! Luckily I only did it on one clip though.
Apple
Subscribe to:
Posts (Atom)