9.28.2011

Bean Bags

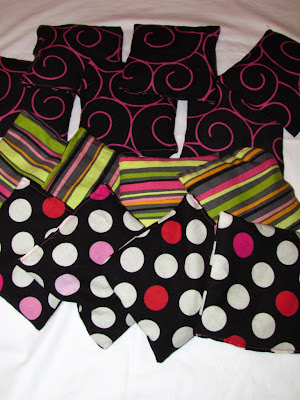
As you know, I made some beanbags for the beanbag toss with leftover fabric. Total cost? $0. I had rice and beans and that's what I filled them with. Here's what you need for a 5"x5" beanbag:

fabric
rice/beans
coordinating thread

I didn't take pictures along the way, but they're so easy, an explanation should be fine.

1. Cut fabric into 6"x6" pieces.
2. Place fabric right sides together and pin
3. Sew 3 sides using 1/2" seam allowance; trim
4. Turn right side out
5. Fill bags with approx. 1/2 cup rice/beans
6. Fold unfinished fourth side into bag and sew closed

Here's the finished product:


Happy Sewing!

Apple

9.27.2011

Pirate Swords and Hooks

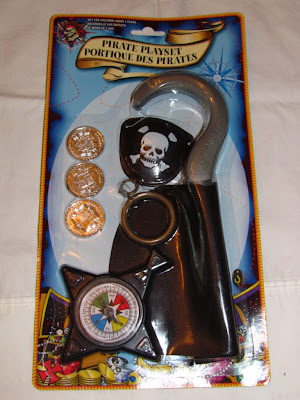
OK. So I'm kinda done with making stuff for the pirate party. I've been a little under the weather lately and the thought of trying to make anything else hasn't been very appealing, so I cheated. I ended up going back to a different Target and they had some of those foam swords for $1 each. Today I decided to try the dollar store again to see if I could find a hook and I was in luck! I found a pack that has a hook, eyepatch, 3 silver coins, an earring, and a compass all for the grand total of $1. So I ended up spending $10 for 5 swords and 5 goody packs of pirate stuff. Here are the pics:


The day of the party I'll make sure to take a picture of everything because I have a fisherman's net and I bought seashells to put in it. I'm also planning on a couple of other things to put up in the house. I was going to make a pirate ship, which is probably not going to happen, but we'll see.

Apple

9.21.2011

Pirate Rhymes

Here's my clever (or so I think) rhymes that I came up with. Although, the first one I found online but I changed it slightly. It's kind of hard to write in pirate'ese' but I'm gonna try:

This will be the clue the kiddos will be handed before they even go outside:

1. Fer yer first clue as good pirates know, find the place where pumpkins grow.

Once they find the pumpkins, they'll receive their pirate hat and their next clue:

2. I'll tell ye a secret, the best ye've heard, but first matey, can ye find the bird?

When they find the bird they'll get their belt and eyepatch and their next clue:

3. Watch ye step! It's me ye'll thank. Fer yer next clue ye'll walk the plank!

The plank is going to be a piece of wood on top of two cinder blocks over a blue tarp for water. Once they walk the plank, they'll receive their hook and their next clue:

4. Now ye'll let yer feet set sail and find a message in a pail. Again the message ye will hide and leave this place upon a slide!

I have to say I was pretty pleased with myself for this rhyme! I'm going to hide a bucket filled with sand at the top of the slide and in the sand I'm going to put a "message" (their clue) in a bottle. When they're done they will put the bottle back, get their sword and slide down to their next destination:

5. Ahoy! I think we're under attack! Find a tree, but look on it's back!

For this one I'm somehow going to do a makeshift arrow and stick it into one of the trees in the backyard. Hanging from the arrow will be their final clue. I'm going to make little notecards for the parents to take so they can remember everything because this last clue is long. I have to get the kiddos to the front yard for a beanbag toss and they can "dig" for their treasure in the straw. Now this is the piece de resistance of rhymes! I was so proud of myself with this one that I had to call my mom, my sister in law (Leaf) and my hubby at work just to read it to them. Yes I'm slightly obsessed with this party!

6. Yer almost there, but be aware, I know there be a croc somewhere! Around the front, me thinks ye'll find some fuzzy feathered friends of mine. The crocodile will want a snack, so feed him and go 'round his back. Grab a fuzzy feathered friend, Alas! I think yer at the end. Find yer X and then ye'll see the treasure of yer victory!

COME ON! IS THAT AWESOME OR WHAT?

For this one they'll go into the front yard, feed the crocodile (to distract him) which is the beanbag toss, and then they'll grab a bird, clip it to their shoulder and dig for their own treasure (each child will have their own X which will be the same color as their hat to eliminate confusion) which will be buried in straw. The treasure chests will be filled with chocolate gold coins, gummy worms, spider rings, tattoos and other goodies.

Total cost for this whole party including EVERYTHING? $50. Not bad I think for 6 pirate hats, belts, eyepatches, hooks, swords, mops (to swab the deck...got these from the dollar store), balloons, goodies, and treasure chests. This does not include food, but we're ordering a couple of pizzas and one of the moms is bringing a cool piratey dessert.

I wanted to make this as cool as possible for the least amount of money possible. I think I hit the mark. I'm sure the kiddos are going to have a lot of fun and hopefully the parents will too!

Apple
9.15.2011

Pirate Swords?

OK. Here's why I haven't posted yet about these things. I cut them out and they looked AWESOME!


So I finally started trying to make them look more "swordy" and that's where the trouble began. I read online about covering the blade with foil. I was going to cover the handle with batting and wrap it with electrical tape and that would probably be pretty cool. But then I started thinking..."hmm...the oldest child is 4 and they will probably end up ripping the foil so I'll try duct tape". Let me tell you...that wasn't pretty. First I tried to wrap the tape from the bottom all the way to the top. Didn't work. Then I tried a straight piece all the way up and then where the blade curves I used smaller pieces. Again, didn't work. So I decided to try foil and that was super lumpy and bumpy.


So now I don't know what to do. I thought that maybe I could just paint them, but I don't feel like doing that. So now I'm thinking I'll either keep them black or just buy swords. About a month ago I was at Target and they had foam swords for $1. Guess who said "No, I'm gonna make mine and they'll look way cooler"? Yep, it was me. So today I go to Target and surprise, surprise, no foam swords!!!! ***SIGH*** What should I do? I have to say I'm a little discouraged. Now I don't even want to bother with trying to make the hooks. So that's where I am right now and that's why I haven't posted anything this week. Any ideas?

Apple

9.08.2011

Treasure Chest

In my last post I mentioned the treasure chest that Kermit was holding. I thought I'd post what's inside just in case you were wondering :-)

Here is the chest. I bought this from the party store. It was easy to fold and this is the end result:

 Inside there is a bag to hold their goodies if their box gets destroyed, a scroll which has a maze on it, a giant sticker, tatoos, a spider ring, a kaleidoscope, and a tiny slinky. I'm also going to add chocolate coins to the treasure.

The Jack Sparrow stuff all came in one big goodie bag for about $10. I bought the spider rings and tattoos seperately. So thats it! That's all of the treasure!

Up Next: Pirate Swords

Apple


9.06.2011

Pirate want a Parrot?

This is a super simple, easy idea for a parrot. I originally went to Michaels and they had songbirds with an attached clip for feet on clearance for $1 so I bought them and figured they would be good enough. But then I went to Hobby Lobby the other day and saw these flat little colorful parrots made from MDF or something for only .67. As I was looking at them I thought..."Why not attach a pin to the back of these things for the kiddos instead of using the songbirds?" It was a lightbulb moment. The kids are young so a bird sitting on their shoulder would probably annoy them because it would be rubbing their little faces too much. Whereas this idea can just be pinned to the shoulder of their shirts and not annoy at all! They were kind of plain so I prettied them up with some glitter glue and Voila! Cool parrots for the pirates!

This is what they look like:

 A closeup:

I just started gluing all around the outline of the feathers:


Here they are all glittered up: 

 Because I didn't think this out, I added the glitter glue before I attached the pins to the back. So I started applying the pins before the glue was dry. It was hard not to stick my fingers in the glitter glue because it was still wet. Needless to say, before I was done, I had glitter fingers. Anyway, I went to the jewelry making department and picked up these pins.

 Hopefully you can see what kind I used in this picture:

Add your glue:

 Attach the pin:

 Press firmly and you'll start to see the glue coming through the holes of the pin.

And here it is completed. I left the label on because it's like they super glue these things to the back and when you try to tear it off, you get one little piece at a time. So I gave up!

So there you go. Easy parrots for your pirates!

Remember the other day I said Kermit was going to be showing up in a future post? Well today is the day. I wanted to show how everything has come together and won't post pictures of my little one. So my husband came up with the idea of using this HUGE Kermit he won at an indoor amusement park about 12 years ago. I have to say Kermit doesn't look like he's aged a bit! He normally lives in our basement, but I took him out for a few pictures. So he's now Captain Kermit!


OK, so you can see now how everything is coming together. Notice how the belt ties on the side and how nicely it hangs while the buckle is nice and centered. I had to cover Kermits eyes with the hat, but you get the idea. Where human eyes would be is where the eyepatch is. My husband decided to have Kermit hold a kaleidoscope because its funny! The treasure chest is what the kiddos will be "digging" up when they find their treasure.

Up Next: What's in the treasure chest?
Apple


9.04.2011

Felt Pirate Hats

Finally! I have been talking about these hats for ages. I have 5 hats with different colors. I have a blue, green, white, orange, and red. I was going to monogram each child's hat, but have decided not to. I bought some rubber stamps on clearance and may just stamp the center of their hat to match their "ribbon". When sewing everything, just get as close to the edge as possible.

Here we go:

Step 1: Cut out a template. I used a Cheerios box. Your hat should be about 19" wide by 10" tall. I just drew this hat freehand. 


 Step 2: Cut out all of your strips to match the shape of the hat.


 Step 3: Cut out your hats according to the template. You obviously need 2 pieces per hat. I made 5 hats so I had 10 pieces. These are the same size, but for whatever reason the top piece looks a lot smaller.


 Step 4: Pin your strips to the front piece of the hat and sew with coordinating thread.


 Step 5: After you finish sewing all of the strips on, just sew on the back piece to complete the hat.

This is the first hat I did. I used white. I figured if it turns out bad, then I'd redo it. But it turned out good so I decided to use this hat for my little one. But since she is the captain, I had to make her hat a bit flashy! If you look closely, you can see the white strip beneath the feathers. To attach the boa, I just used my glue gun.

If you're wondering why Kermit is in this picture, you'll have to wait! He will be showing up in a future post.

These hats really are easy to make. The part I hated most was cutting out the strips and that wasn't horrible. It's exciting to see them come together!

Up Next: Parrots!

Apple